Arduino Controlled Airplane [28Apr20]

Associated Videos:

DIY Arduino Controlled Airplane pt. 1

Project AURA Part 2: Airplane Directional & Speed Control with Hc-12


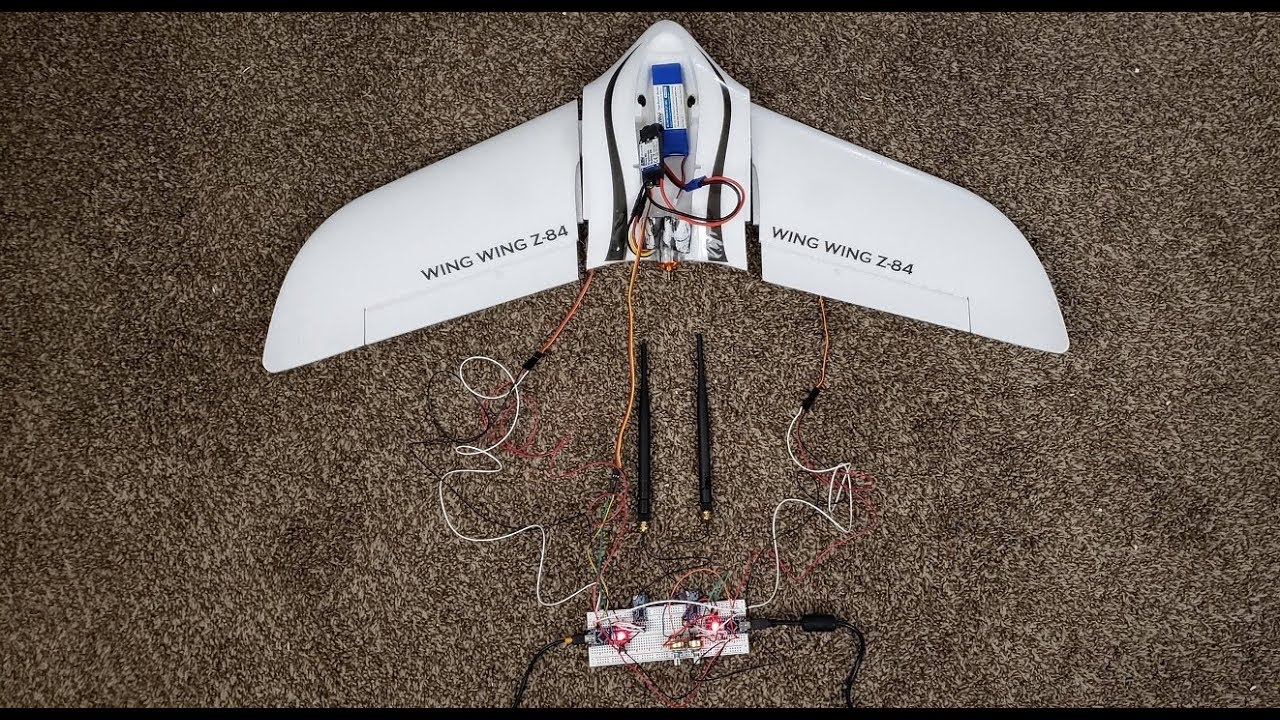
Project AURA stands for the A(utomated) U(nmanned) R(econnaissance) A(irplane), & will be manipulated by the arduino microcontroller without my control. Extensive testing will be required as this will be the replacement for Project ROWAN since there are a lot of timing & construction demands ROWAN requires that I’m not able to give. Though ROWAN is shelved it does not mean that it will be gone permanently, just for the time being. AURA by comparison requires a lot less time & effort being that all I must do is set up the code & conduct testing. Be that as it may, check in weekly for updates on this article since I’ll update the date next to the title as new information is provided.

What Is AURA?

AURA is an automated drone that I will program & test for FPV (First Person View) use as well as to demonstrate the power & capabilities of the arduino when used in a correct, legal & safe manner. A variety of sensors & codes will be utilized to ensure the plane doesn’t pose a risk to itself or anyone it may fly over as well as any associated property. Being that it will be exposed to high winds, birds of prey, malevolent kids & the like, I must take all things into consideration as I assemble the final product. Even without the external forces, I still must contend with potential internal issues such as the placement & proper securing of hardware, testing proper center of gravity, as well as ensuring the hardware can endure being exposed to the weather. Once these factors have been verified I will move on & extend the range for a more diversified view area.

Despite AURA having the term ‘reconnaissance’ in its name, by no means will it be used for any data collection or processing of human, business, or government activity when there is a reasonable expectation of privacy. Despite this promise on my part, there are still rules & regulations that must be followed in order to safeguard myself from any penalties under the law from city/state/federal law enforcement or associated agencies. So not only will I provide you most of the code required to build your own AURA, I will also discuss the laws that apply to you the maker if you’re in America. I’d hate you or myself to get in trouble with the FAA (Federal Aviation Administration)!

The FAA (And How To Avoid Their Ire)

Show FAA Section

The following are a list of resources you’ll need to fully understand FAA guidelines:

FAA No Fly Zone Map, FAA UAS (Unmanned Areial System ) Page, Academy of Model Aeronautics

Documents:

Academy of Model Aeronautics (AMA) Safety Hand Book [Up To Date As of 23Apr19]


Academy of Model Aeronautics (AMA) Advanced Systems [Up To Date As of 23Apr19]


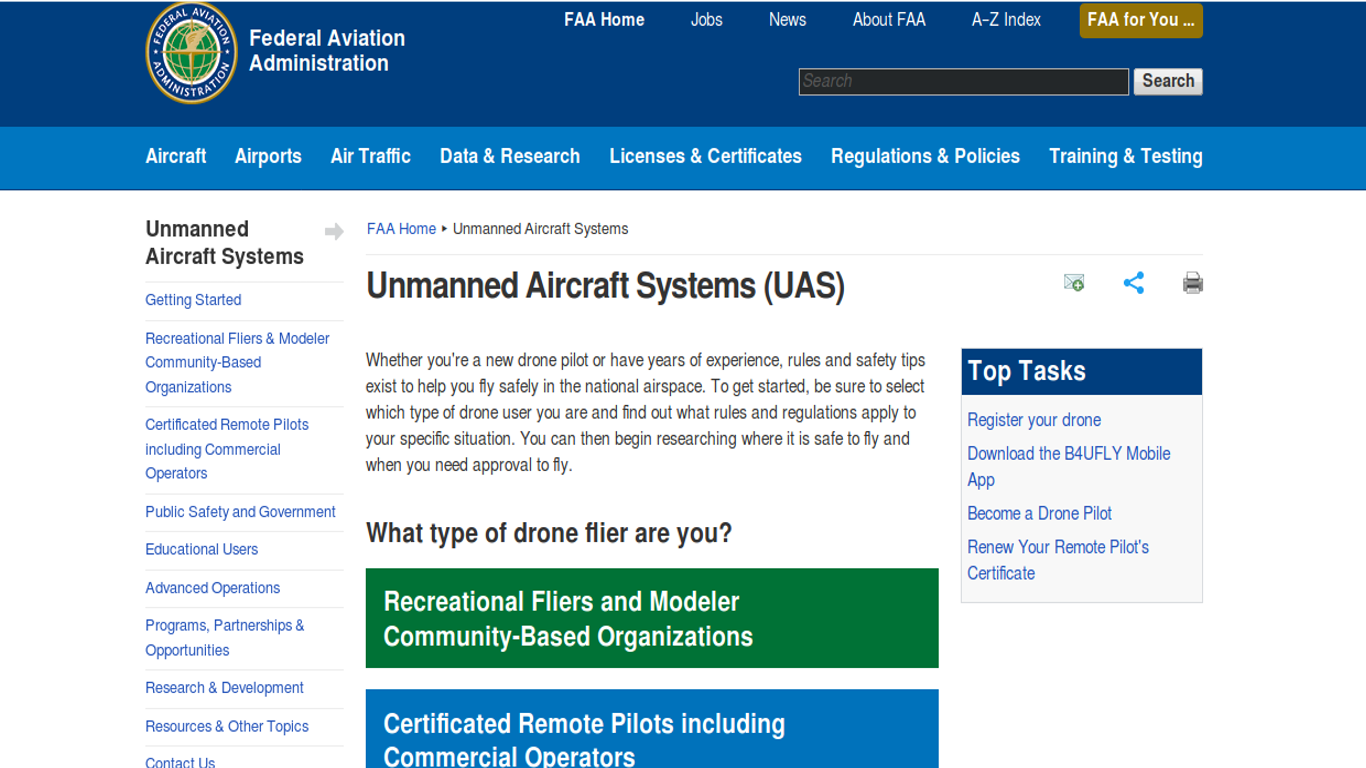
Let’s first visit the FAA website, which as you see in the below picture asks you the type of flier you are. Being that I’m going to show you how to build AURA as a hobby-based aircraft, we’ll select “Recreational Fliers & Modeler Community Based Organizations”.


The next webpage gives you a list of instructions of how to stay in the FAA’s good graces as an aero-hobbyist, which include registering your drone, reviewing the rules, knowing where to fly, & of course to have fun flying. Registering your drone requires you to register under section 336 of the FAA rule provided you’re over 13 years old & are able to pay the $5 fee. After this you will receive a registration number that must be placed on all drones you own in an easily seen area.


Becoming A Member of the AMA

Step two, bullet point two of the Recreational Fliers & Modeler Community-Based Organizations page requires you to follow the safety guidelines of a model aircraft community-based organization such as the AMA or the American Modelers Association. All things considered, it seems that registering to their website & becoming a member is required to fly under part 336 for the FAA. Checking out their benefits page you’ll see why its a good idea considering it has great coverage in cases where you as the flier may cause property damage or injuries that could result in the death of another person. We certainly don’t want to have blood on our hands, so beyond covering ourselves with insurance, we must also take care not to engage in risky activities that could cause harm to life, limb, or property nor code AURA do it either.

In order to follow the AMA guidelines, let’s look at their safety handbook


To some it up, don’t do the following:

  • Fly above 400ft.

  • Invade someone’s privacy

  • Fly in no fly zones

  • Fly over or around disaster areas

  • Fly over people

  • Fly aircraft with damaged units/ controls

  • Fly aircraft out of sight

  • **A good rule of thumb, if you wouldn’t do it in front of cops, don’t do it or they will be called on you**

Once you pay for your membership, you’ll be mailed a card with your member number that you can retrieve at anytime via online if you were to lose it for whatever reason.


No Fly Zones

The quickest way to get in trouble is to fly in a no fly zone, which is an area where aircraft are banned from flying around. Some examples would be a sports stadium, the White House, near emergency operations, & political events. If you’re caught flying in such as area, expect hefty fines if not jail time & a felony on your record. No fly zone areas can be found here & are updated daily for your convenience. Below you see an area in Nevada that details some things to be on the watch for.

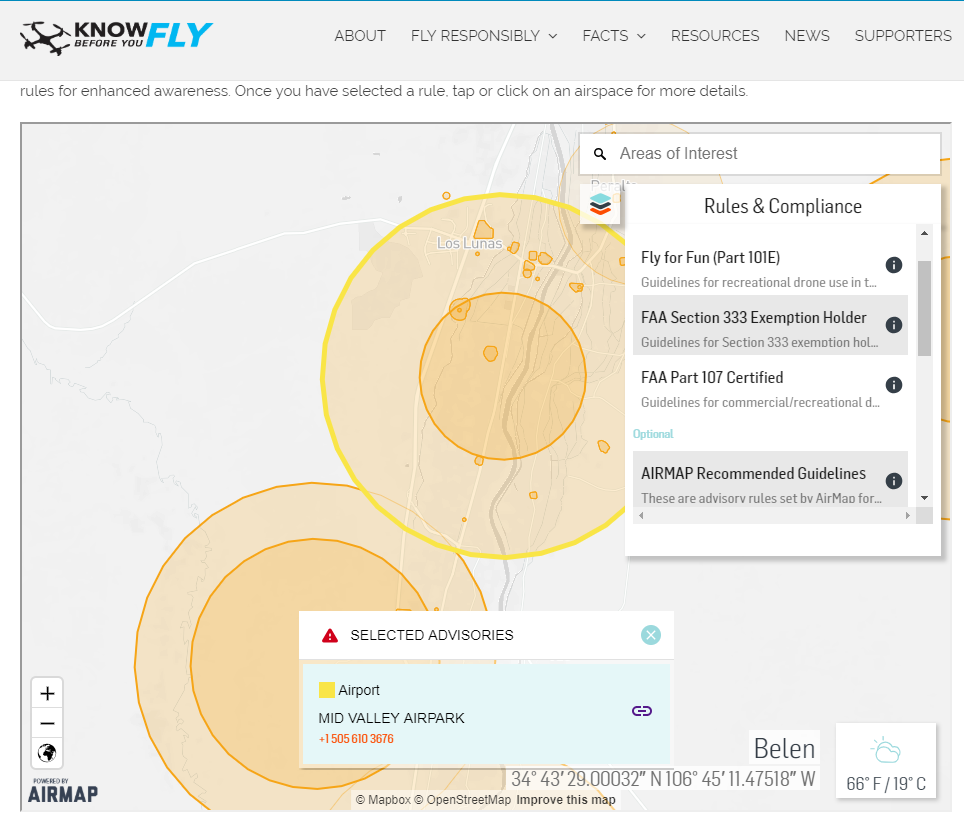
The different color circles highlight different airports that must be contacted if you’re planning to fly. While I personally take issue with having to alert 3+ agencies every time I want to fly so much as a foot off the ground, its better to be safe than sorry as you never know who may be watching & its good to maintain integrity. Personally, there have been times where people have threatened to report me due to me doing something they don’t like without knowing that I already had myself covered before I stepped out the door. If you go for integrity first & always strive to do things the right way you’ll never have to worry.


General Materials Listing & Description

Show General Materials Listing Section
  1. Z-84 Delta Plane– Platform from which we will place all controls & electronics

  2. HC-12(x2)– RF unit that allows for remote control of plane when emergency situations arise.

  3. I2C LCD– Displays sensor readings to pilot.

  4. +30 Amp ESC– Unit that directs the battery how much energy is directed to the motor. ESC amp value MUST be higher than the battery value or there’s significant risk of ESC explosion (Its happened to me, not fun at all). The C rating on the battery tells you the max amperage the battery can deliver, so make sure your ESC is at least 5 amps above the battery amperage value.

  5. 9g Servos (x2)– Dictates the planes direction.

  6. 1806- 2900 kv Brushless Motor- The amount of motor rotations per volt applied to the motor. Being that this is a flying wing, the prop doesn’t need to be large, but must move fast.
  7. 5×5 propeller– The digits to the left of the x tells you the overall length of the prop, the digits to the right tells you how many inches of thrust you get per prop rotation.

  8. Gyroscope– Presents values that determine the plane’s position along its pitch, roll, & yaw axis.

  9. Altimeter– Determines how high the plane is.

  10. Buzzer– Activates upon fault detection.

  11. Potentiometer– Used to adjust motor speed.

  12. Joystick– Dictates aircraft movement during emergency conditions or when in manual mode.

  13. Voltmeter– Sensor connected to each battery to monitor the voltage in each battery. Sends a high signal to the main computer when the voltage drops below a threshold, triggering return to home feature.

  14. Flight Battery– Powers the aircraft & associated hardware.

  15. Arduino Battery– Powers the arduino & associated equipment.


Demonstration Video:


Automated & Manual AURA Units

Manual Flight

Before constructing the automated AURA, I first need to construct a manual version as seen in the above video. Though it would be great to build a program where I only need to throw the plane in the air, that leaves no room for error in emergency situations which could occur at any time. The highest priority would be knowing how to fly my plane so that as soon as I see it having a failure I can take the controls away from the program & land it safely without injury. From my months of working I’ve actually made a few breakthrough discoveries & hypothesis that will make the path to an automated plane much shorter. You can see in the above demonstration video that at the :59 second mark there is a constant twitching of the servos as the ailerons are constantly readjusting themselves to the correct position. This twitching is small & negligible on the ground, but at high speeds the series of small consistent jumps could lead to the plane wobbling & a fallen plane, thus a failed project. This is based upon the signal reception being a constant stream of data, which has the additional effect of occasionally sending wildly out of place values that cause the ailerons to drift from one side to another, spelling disaster for an aloft plane.

The solution was clear in that I needed a signal to be sent AFTER the program detected a change in potentiometer values as well as a filter on the transmitter & receiver to mitigate the chances of wild values being transmitted to the plane. Though occasional wild values are processed, that vast majority of upsets have been mitigated after a several minute verification test. It’s to the point now where I’m comfortable deploying it were I to have the motor as long as I kept in the back of my head the unfortunate prospect of wild values being processed mid flight. I also needed to code a math equation to dictate whether the plane ascends or descends, so after a lot of pondering I finally got the math to cooperate. The biggest advancement I made was that of the HC12 radio. I always used the arduino microcontroller to manage the signal reception & transmission, but have found that a compact way of managing the radios would be by using ATTiny chips. These chips are incredibly small when compared to the arduino & by their construction much smaller memory than the arduino. While seemingly a detriment, this is acceptable as the manual version of AURA only needs to process motor speed & servo values along with maintaining gyro stability. I’m still working on getting the ATTiny to work with the MPU-6050, but in due time it will operate effectively & be able to tell the flight controller (ATTiny controlling the motor/ servos) where to move its servos to maintain flight.

The prerequisites needed to graduate from manual to automated flight is as follows:

  1. Effectively control AURA in manual mode & gain confidence in flying during emergency situations.
  2. Successfully program the gyroscope to correct flight malfunctions when in manual flight.
  3. Verify maximum signal transmission range & automated procedures if no signal is detected.
  4. Modify transmitter with capability to do range test as well as constantly maintain connection with plane.
  5. Create & test fail safe subroutines in case communication signal stops or signal reception is null.

Once the prerequisites are accomplished & verified, the next step would be to incrementally add & test additional sub systems. Though this is the manual flight, I would still like to test additional subsystems such as a clock & light detection unit, SD Card unit, etc. on their own circuit so they don’t interfere with manual flight while still providing data to analyze.

Side Project: Radio Extension

Assuming manual flight success, I would like to expand the range test to wirelessly chaining the radios together so that one antenna communicates to another on one frequency, then that receiving antenna changes it frequency to another in order to ultimately transmit data to the plane. The primary question is if it’s possible to do & if so what’s the range? The antennas for the extension can’t be dipole antennas as the gain is incredibly small when compared to using dish antennas; as they can point to each other in a chain until the signal transmits to the last antenna, which will track the plane’s direction, moving with it as it flies. There are some kinks to work out such as how the processor knows which direction to orient the antenna from the plane’s input & how to reliably move said antenna in the first place. I have to foundation of its operation, but until I’m able to conclusively verify the code & operation I will standby on giving out detail.


Automated flight

Automated flight is easier in that most of the readings will come from the altitude sensor & gyroscope & that no input is needed from me to ensure it doesn’t fall out of the sky. The difficulty comes with the constant testing required to ensure the default values I code for are correct & are able to maintain efficient flight. I anticipate a lot of crashes that may lead to replacing the plane once or twice during its lifetime, but it is an anticipation that I look forward to as its part of learning new skills. An additional problem is that the arduino microcontroller can hold but so much data before components aren’t working properly. To mitigate that I switched to using an STM32, which holds twice the code as the arduino on a slightly larger form factor. The only drawback is that it seems to be unable to use the HC12 radios as every attempt I’ve made to connect them results in an error, so as of now I’ll resort to using the ATTiny for the radio & the STM32 for the SD card, light sensing unit, etc.