The SD card unit is typically used for data logging & retrieval since its able to retain saved data if the arduino is turned off. This reference page will detail how to use said unit as well as present tips to maximize efficiency & ease of use.
Basic Code Set Up:
1. Setting Up SD Card Values
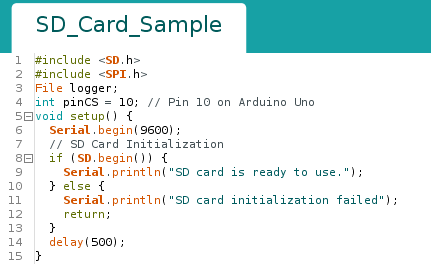
Line 3 is where you customize the name associated with the SD card. Note that this isn’t the filename itself. Note that you can have multiple instances of the File name. Example: File dataLogger, File fileRetriever.
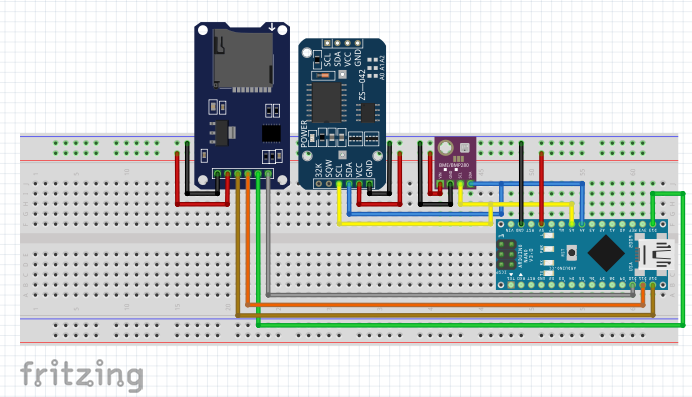
Line 4 pinCS variable determines what digital pin number of the CS pin, which connects from the arduino pin 10 to the CS pin of the SD card unit.
Lines 8-13 attempts to access the SD card itself & (optionally) prints out a message to the serial monitor informing you if the attempted access was complete or a failure.
Line 12 repeats the attempt & subsequent message.
2. Opening & Writing To SD Card
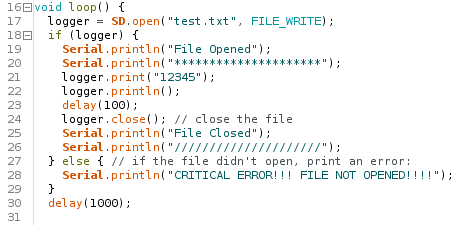
Line 17 logger is set to the operation of making the test.txt file on the SD card. It will be explained later, but its important that after the comma in “test.txt” you select if you will be reading from the file or writing to it. In this case we’re writing to the file.
Line 18 can be condensed to say that if the SD card can be opened & a filename of test.txt can be created, do what is in the following curly brace.
Lines 19-22 provides information to the user via serial monitor (lines 19 & 20) & prints data into the SD card (lines 21 & 22).
**Note: Delays aren’t necessary when opening & closing files & adds zero extra benefit to doing so. For me its a force of habit, which is why its included in line 23.
Lines 27-29 is what will be printed in the serial monitor if the arduino can’t access the SD card, make the file, then print to it. You can add extra functionality to this section by replacing the serial print with an alarm or an operation if the SD card is required for specific sensors. An example would be if you were starting up a heater but the arduino couldn’t access the SD data telling it when to turn off or what series of operations to perform after data access. In that case you could have the arduino shut power from the heater, begin system shutdown operations, & ring an alarm.
Line 30 allows the serial monitor to be blasted with data.
Line 31 intentionally doesn’t have a closing curly brace as there’s more code below.
3. Reading SD Card String & Int Values
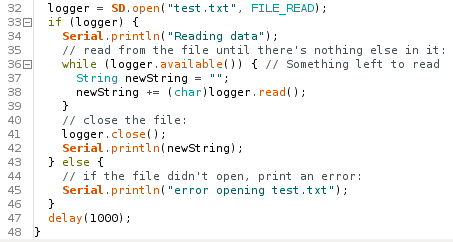
Line 32 Change logger value to open text, its important to change attribute to FILE_READ (described further below).
Lines 36-39 extracts the data inside the .txt file and saves it to the string titled newString. If the data inside the file just contains numbers you can use int newString = logger.parseInt(); instead of what’s presented in line 38. Assuming you’re using the code provided in the above snapshot, you can convert the string to an integer by using int data (where data can be any name) = newString.toInt();
Line 41 closes the SD file.
Line 42 prints the saved value.
Line 43-45 prints an error if unable to open the file.
SD Card Reference
**Note that file is equal to the custom file name you declared.
SD.begin(); Starts up the SD card library. Alternatively, you could include the cspin number by stating SD.begin(cspin number)
- SD.exists(filename); Attempts to access a file. Sends a true value if it exists & false doesn’t exist. From here you can create the missing file or execute a specific function.
- SD.open(filepath, FILE_READ/FILE_WRITE); filepath can be a custom max of an 8 character name. The FILE_READ/WRITE function is required to identify if you’re writing or reading to/from a file.
- SD.remove(filename); deletes a file.
- SD.mkdir(); Creates a directory. Example: SD.mkdir(dirA/dirB/dirC);
- rmdir(); Removes directory from SD card. Ensure there are no files within the directory.
- size(); Retrieves the size of a file & can be used to overwrite data if it reaches a maximum size.
- name(); Returns the filename
- close(); Closes a file
- print();/println(); When printing data to a file, print simply posts the data on a single line while println(); prints the data & starts a new line afterwards. The file must be opened before you can print any data.
- read(); Reads data from a file.
- write(); Similar to print without the file needing to be opened.
| SD Card Pinout (Most Boards) | ||||||
|---|---|---|---|---|---|---|
| Unit Pin | CS | SCK | MOSI | MISO | VCC | GND |
| Arduino Pin | 10 | 13 | 11 | 12 | 5V | GND |
Sample Code:
#include
File logger;
int pinCS = 10; // Pin 10 on Arduino Uno
void setup() {
Serial.begin(9600); // SD Card Initialization
if (SD.begin()) {
Serial.println(“SD card is ready to use.”);
} else {
Serial.println(“SD card initialization failed”);
return;
}
delay(500);
}
void loop() {
logger = SD.open(“test.txt”, FILE_WRITE);
if (logger) {
Serial.println(“File Opened”);
Serial.println(“*********************”);
logger.print(“12345”);
logger.println();
delay(100);
logger.close(); // close the file
Serial.println(“File Closed”);
Serial.println(“/////////////////////”);
} else { // if the file didn’t open, print an error:
Serial.println(“CRITICAL ERROR!!! FILE NOT OPENED!!!!”);
}
delay(1000);
logger = SD.open(“test.txt”, FILE_READ);
if (logger) {
Serial.println(“test.txt:”); // read from the file until there’s nothing else in it:
while (logger.available()) { // Something left to read
String newString = “”;
newString += (char)logger.read();
}
// close the file:
logger.close();
Serial.println(newString);
} else { // if the file didn’t open, print an error:
Serial.println(“error opening test.txt”);
}
delay(1000);
}