The passive infrared sensor (PIR) is a sensory unit that detects infrared (heat) energy and can be configured to trigger events based upon it being active or inactive. We will be using the Elegoo micro-controller to manipulate its output, as well as learning some hardware information.
Required Materials:
Passive Infrared Sensor (PIR) Male-Male Jumper Wires (x9) Elegoo Micro Controller
The PIR sensor is a cheap and easy to use unit that requires minimal effort on behalf of the user; with a few wires and taps of the keyboard you’ll be well on your way to implementing more complicated heat/ intrusion detection systems down the road.
Let’s first look at the PIR’s hardware and detail each of their functions:
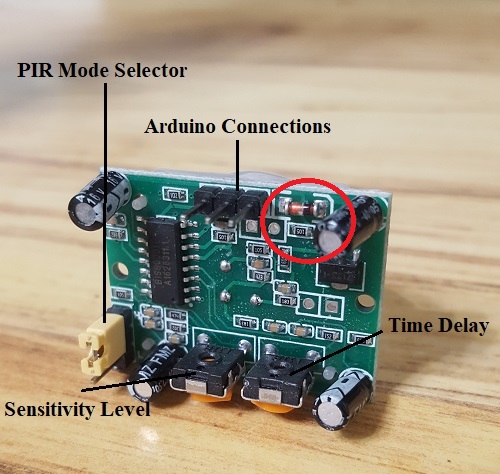
First let’s tackle the Arduino connections, which from left to right consist of your cathode (negative(black)), signal wire (yellow) and anode (positive(red)). If your ever get confused then look for the component in the red circle, which is a type of diode and serves as a reference for where to connect your positive wire to.
Next is you PIR mode selector, which alternates between the H and L trigger modes. Its current mode depicted is the H trigger mode, which will keep a HIGH signal for as long as the heat signature is in motion. Note that seven seconds will elapse before PIR reactivation after it switches LOW for no movement. In the L trigger mode there is a pause before PIR deactivation, which is determined by the time delay potentiometer.
Let’s take a closer look at the potentiometers in the figure below:
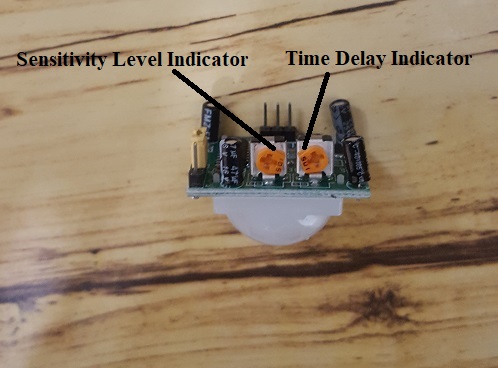
Notice the both potentiometers are pointed inward by the orange square tabs, which are set to their maximum and minimum values respectively. Maximum sensitivity isn’t required as I’ve tested the range at the highest value and maintained detection in excess of twenty feet. This makes it prime to detect any intrusion in a room and trigger an event from there. The maximum time lapse between activation and deactivation is approximately 5 minutes, though I see no reason why someone would want any delay when detecting someone, which is why I recommend you use the H trigger mode over the L.
Now let’s dive into the assembly below:
Fritzing Sketch:
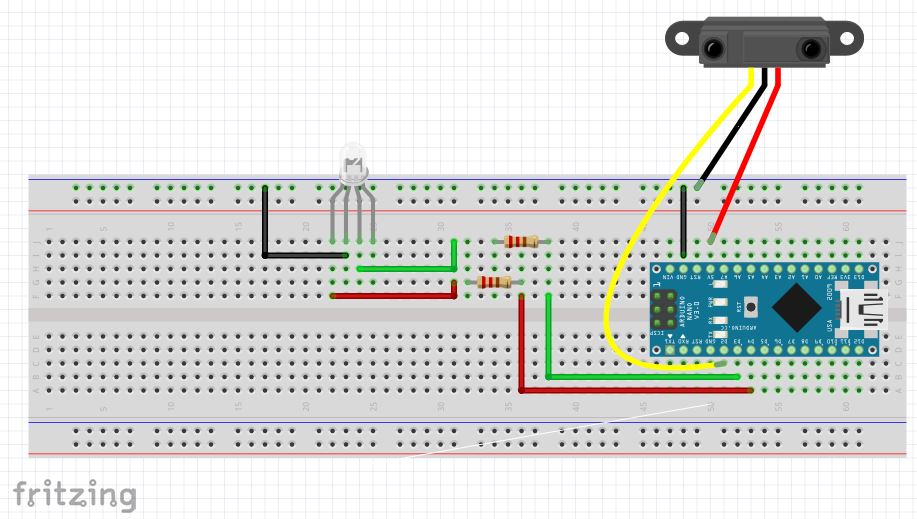
NOTE: The wire color order in this Fritzing sketch are contrary to what was stated earlier. Ignore this inconsistency as I’m unsure why they have it as such.
Once you have everything connected as shown, copy/paste the following into your Arduino IDE:
#define redled 13
#define greenled 12
int pir;
void setup() {
// put your setup code here, to run once:
pinMode (pir, INPUT);
pinMode (redled, OUTPUT);
pinMode (greenled, OUTPUT);
}
void loop() {
// put your main code here, to run repeatedly:
digitalRead(11);
if (digitalRead(3) == HIGH) {
digitalWrite(redled, HIGH);
digitalWrite(greenled, LOW);
} else {
digitalWrite(greenled, HIGH);
digitalWrite(redled, LOW);
}
}
Next, verify the board type and COM Port, then select upload. If everything is set up as described then you should have a fully functional PIR sensor, congrats!
Now that we’ve covered the hardware and software required, what’s next for this project? What could you use it for? My first thought when building a motion detection unit is to have motion activated lights. If mounted in your wall, it could activate if someone walks in your room for a period and deactivate automatically, saving money in the long run if you’re bad about turning your lights off when leaving your home. Further improvements would be to have a data recorder that records the time & dates your motion sensor activated. If cross-referenced with your own schedule, you can easily determine when someone entered unannounced. This could further be built upon if you had a hidden component in you room which stopped the data recorder from annotating an intrusion if it were reached in time. Since you’re the only person who knows where the hidden component is, you’re the only one who can disable the recording. I’ll build upon this in a later project, but be aware this capability is available to you.