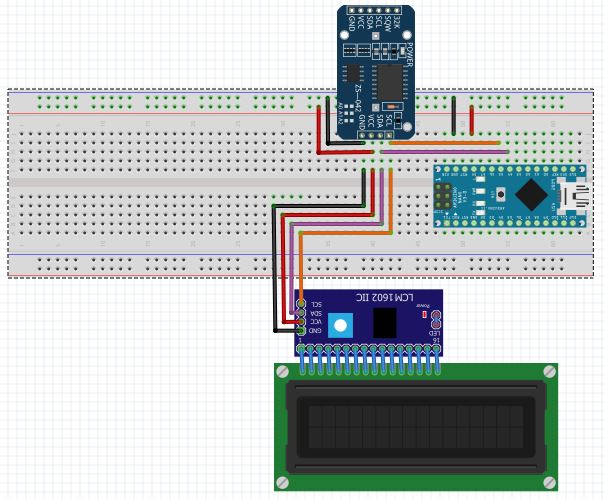
Liquid Crystal Functions
Below is a nonexhaustive list of usable functions with their descriptions. An exhaustive list can be found in the download above in the keywords text file. The formatting I will use is: Text/ Description/ Syntax to use in arduino IDE
Begin– Starts the lcd screen and its column & row dimensions. Must be called first. The columns & rows depend on the type of LCD you’re using.// lcd.begin(columns, rows);
Clear– Removes all text and auto-positions the cursor to the upper left most corner.// lcd.clear();
Home– Positions the cursor in the upper-left of the LCD. That is, use that location in outputting subsequent text to the display. To also clear the display, use the clear() function instead.// lcd.home();
Set Cursor – Position the LCD cursor; that is, set the location at which subsequent text written to the LCD will be displayed.// lcd.setCursor(col, row);
Print – Prints text to the LCD. Be sure to include double quotation marks if printing text (“”). For BASE you can use BIN for binary, DEC for decimal, OCT for octal, HEX for hexadecimal// lcd.print(“Enter text here”); -or- lcd.print(data,BASE);
Cursor– Display the LCD cursor: an underscore (line) at the position to which the next character will be written.// lcd.cursor();
No Cursor– Hides the LCD cursor. Cursor is hidden by default// lcd.noCursor();
Blink– Display the blinking LCD cursor. If used in combination with the cursor() function, the result will depend on the particular display.// lcd.blink();
No Blink– Turns off the blinking LCD cursor.// lcd.noBlink();
Display– Turns on the LCD display, after it’s been turned off with noDisplay(). This will restore the text (and cursor) that was on the display.// lcd.display();
No Display– Turns off the LCD display, without losing the text currently shown on it.// lcd.noDisplay();
Scroll Display Left– Scrolls the contents of the display (text and cursor) one space to the left.// lcd.scrollDisplayLeft();
Scroll Display Right– Scrolls the contents of the display (text and cursor) one space to the right.// lcd.scrollDisplayRight();
Autoscroll– Turns on automatic scrolling of the LCD. This causes each character output to the display to push previous characters over by one space. If the current text direction is left-to-right (the default), the display scrolls to the left; if the current direction is right-to-left, the display scrolls to the right. This has the effect of outputting each new character to the same location on the LCD.// lcd.autoscroll();
No Autoscroll– Turns off automatic scrolling of the LCD.// lcd.noAutoscroll();
Left To Right– Set the direction for text written to the LCD to left-to-right, the default. This means that subsequent characters written to the display will go from left to right, but does not affect previously-output text.// lcd.leftToRight();
Right To Left– Set the direction for text written to the LCD to right-to-left (the default is left-to-right). This means that subsequent characters written to the display will go from right to left, but does not affect previously-output text.// lcd.rightToLeft();
Create Char– Create a custom character (glyph) for use on the LCD. Up to eight characters of 5×8 pixels are supported (numbered 0 to 7). The appearance of each custom character is specified by an array of eight bytes, one for each row. The five least significant bits of each byte determine the pixels in that row. To display a custom character on the screen, write() its number. To create a custom character, use a website such as this.// lcd.createChar(num, data);