3D printing is a not-so-new technology that has applications for day to day hobbies, industry, and surprisingly aerospace. I’m not going to try and sell 3D printing to you as that’s why there are other websites that do that. Let’s get into the meat and potatoes.
Getting Into 3D Printing
Very easy, occasionally mind melting when you feel that nothing is going your way, but as long as your a tinkerer and know how to use Google you’ll be all good. I will be updating this article as time permits so it serves as a one stop shop for all your needs. Saves time and frustration as I’ve learned first hand since some videos and tutorials leave out key data points that would otherwise save you from tearing out your hair. Below is a list of upgrades that will enhance your 3D printing experience. Do you need to drop $700 now? No. But keep the chart in mind when you decide to do incremental upgrades, because as you gain more experience and start tinkering, you’ll inevitably want to make some changes to your printer. And I know first hand.
| Item | Price | Multiples | Source | Use Case | Subtotal |
|---|---|---|---|---|---|
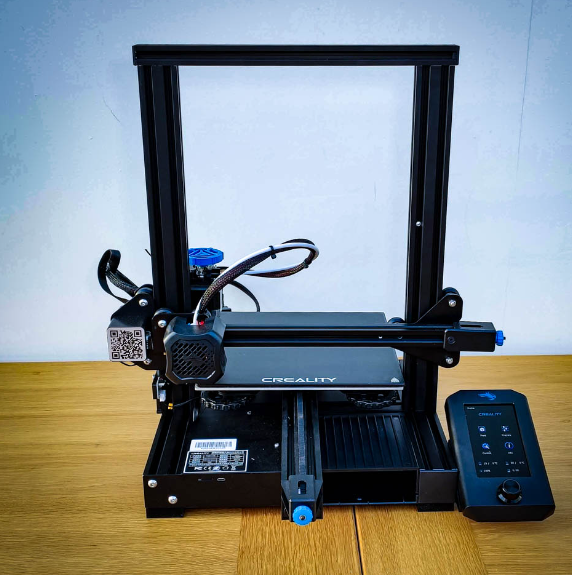
| Ender 3 v2 | $213.99 | 1 | Ender 3 v2 | 3D Printer. | $213.99 |
| Hardened Nozzle | $8.55 | 1 | Hardened Nozzle | Longer lifespan compared to brass nozzles | $8.55 |
| PETG Filament | $20.99 | 1 | PETG Filament | Mid grade filament for outside use | $20.99 |
| PLA Filament | $13.99 | 1 | PLA Filament | Beginner grade filament for models and toys | $13.99 |
| PTFE Teflon Tubing | $14.99 | 1 | PTFE Teflon Tubing | Needed to route the filament | $14.99 |
| Bowden metal extruder | $13.99 | 1 | Bowden metal extruder | Upgrade and less likely to break | $13.99 |
| All metal Hotend | $63.50 | 1 | All metal Hotend | Allows for printing higher grade filaments without ingesting toxic fumes. | $63.50 |
| Extra Steel Extruder Wheel Gear | $6.99 | 3 | Extra Steel Extruder Wheel Gear | Consumable item. Required | $20.97 |
| Extra Wheels | $9.79 | 1 | Extra Wheels | Needed as the wheels will degrade over time. | $9.79 |
| 40mm Cooling Fans | $8.79 | 2 | 40mm Cooling Fans | Needed consumable for when the fans degrade over time. | $17.58 |
| Extra Limit Switches | $8.79 | 2 | Extra Limit Switches | Consumable as the limit switches will degrade over time. | $17.58 |
| Ender 3 v2 High Temp Thermistor | $9.99 | 1 | Ender 3 v2 High Temp Thermistor | Higher temperature tolerance than stock thermistor. Allows for printing higher grade filaments. | $9.99 |
| Ender 3 v2 Heating Element | $7.99 | 2 | Ender 3 v2 Heating Element | Allows hot end to obtain higher temps. | $15.98 |
| Pneumatic fittings | $6.99 | 1 | Pneumatic fittings | Extras needed as consumables | $6.99 |
| Micro SD Card Pack | $19.99 | 1 | Micro SD Card Pack | Storage of STL files for printing, SD storage can be 3d printed. | $19.99 |
| USB C; SD Card Reader | $12.99 | 4 | USB C; SD Card Reader | Allows SD card connection to printer without risking SD Card breaking inside 3D printer’s internal SD card port. | $51.96 |
| Belt | $10.79 | 2 | Belt | Consumable replacement belts for X and Y axis movement. | $21.58 |
| Basic Items Kit | $14.99 | 1 | Basic Items Kit | Needed for Basic 3d Printing | $14.99 |
| Magnetic Bed Upgrade | $20.99 | 2 | Magnetic Bed Upgrade | Allows for printing PETG without breaking glass | $41.98 |
| CR Touch | $39.00 | 1 | CR Touch | Better Bed Leveling | $39.00 |
| Allen Key Hex Set | $14.66 | 1 | Allen Key Hex Set | Needed to tighten/ remove hardware | $14.66 |
If you’re looking at this in the far future and some links don’t work that’s okay, just Google or Amazon search the name of the linked item to find a suitable substitute. Note that you don’t HAVE to purchase an Ender 3 v2, but know that this entire tutorial is based upon its purchase and assembly/ operation. I’m not sponsored by them, but I have a lot of experience using their product when I was a beginner.
For printer assembly instructions, I’d use this YouTube video, as it was instrumental in me not getting all tripped up. I’ll likely use a repository for all future saved videos as we all know YouTube is temporary and channels go up and off everyday. Until such repository is publicized, use the link and watch the video. Once done, follow this tutorial guide to install the BL/CR Touch in your 3D printer. It doesn’t matter which one you buy, just that you buy one or the other. Quick note after watching the BL/CR touch installation video to ensure you measure your X and Y offsets and physically input the values into the screen of your 3D printer. I thought I simply needed to input the values as I was editing the firmware- something we’ll get into later- but I had to input them into the screen. To measure your X Y offset buy a caliper and ensure the measurement values are in millimeters (mm) and measure the distance from the middle of your CR/BL Touch to the middle of your nozzle (left to right), record it, then measure how far forward or backward your CR/BL Touch is from the nozzle (Y offset). Once you’ve done that record it, save it, and input it to your 3D printer status screen.
This is vital to avoid messing up your prints or causing any unnecessary hinderances.
There are two types of beginner filament, PLA and PETG. PLA is polylactic acid, and is a biodegradable filament typically used for general modelling that won’t be exposed to outside conditions or weight bearing, as I’ve discovered its inability to hold much of anything. PETG can be exposed to outside conditions as I’ve tested a model holding electronics for over a month in wind, rain, and snow. For its durability PETG has one main drawback in that is will destroy glass and PEI magnetic beds unless you use hair spray to coat the surface. I’m unsure if the hairspray coating will help glass beds as I’ve never tried, but definitely works on PEI magnetic beds. PETG also requires a higher hot end temperature, but all temperature ranges will be printed on the side of your filament spool.
There are many types of filament with their own considerations. Some filament considerations are:
Required hot end and print bed temperature
Type of printer extruder needed for the filament
Does it off gas any toxic fumes and if so at what temperature?
Is filament sensitive to moisture or drafts
Is an enclosure needed or heated chamber
Does the filament require special storage or curing before or after printing
How expensive is the filament
Is air filtration needed as filament is printed
Can my nozzle or hot end handle the required printing temperatures or the filament itself
Note that this isn’t an all inclusive list. Some studying of the desired filaments are required especially for advanced filaments. If any of you have heard of Zach Freedman, he has posted a Part One and Part Two of every type of filament, providing a lot of their printing temperatures, uses, limitations and alternatives as applicable. Below is a table of filament types and their uses.
| Filament | Hot End Temp *C | Bed Temp *C | Hazards | Benefits | Limitations |
|---|---|---|---|---|---|
| PLA | 180-220 | 65 | N/A | Great for beginner 3D modelling | Easily softened (+100*F) |
| Carbon Fiber PLA | 190-220 | 25-60 | N/A | Great for beginner 3D modelling | Requires hardened nozzle |
| PETG | 220 | 65 | N/A | Great for outside applications | Requires hair spray layer to prevent damaging PEI Magnetic bed and glass beds |
| High Impact Polystyrene | 148-176 | 90-110 | N/A | Water tight layer adhesion, takes impacts like a champ | Needs kaptom tape layer for bed adhesion, Needs enclosure to prevent draft exposure |
| Polypropylene | 225-245 | 80-105 | N/A | Impact, water, chemical resistant | Only bonds to itself as a layer/ Sensitive to drafts, requires enclosure, Burns easily, sensitive to UV degradation |
| ABS | 230-260 | 95-110 | Off Gases toxic fumes, enclosure with filter needed | Chemical and heat resistance | Sensitive to drafts and will shrink, requires enclosure |
| ASA | 240-260 | 90-120 | Off Gases toxic fumes, enclosure with filter needed | Temperature/ Impact/ UV resistant | Sensitive to drafts and will shrink, requires enclosure |
| Acrylic | 76-87 | 60 | Off Gases toxic fumes, enclosure with filter needed | Can be vapor polished | Sensitive to drafts and will shrink, requires enclosure |
| Polycarbonate (PC) | 250-270 | 90-105 | Verify if filament is pure PC or an alloy | Impact/ temperature resistant, flexible | Extremely hygroscopic |
| Carbon Fiber Polycarbonate | 240-260 | 80-100 | Verify if filament is pure PC or an alloy | Impact/ temperature resistant, excellent for drone parts | Extremely hygroscopic |
| Nylon | 220-280 | 70-80 | N/A | Impact/ temperature resistant/ incredibly strong | Requires heated enclosure to 40*C, EXTREMELY hygroscopic/ NEEDS Dry box |
Parts of A 3D Printer
Hot end— Used to melt filament for printing. There are two types of hot ends, all metal hot ends and – get ready for it- normal hot ends. all metal hot ends are a higher caliber to normal hot ends in that they can achieve temperatures of 500 *C whereas a normal hot end has a max temperature of about 300 *C. Note that for a normal hot end you shouldn’t go over 300*C due to the PTFE tube as you will burn the tubing, releasing toxic fumes.
CR/BL Touch— Great piece of hardware that auto levels the bed to enable successful prints. You will also have to plug in you X,Y,Z offsets, but once done you’ll be well on your way to successful prints.
Limit Switches— Assuming you installed the BL/ CR Touch, there are two limit switches (X & Y axis limit switch) that tell the 3D printer that it has encountered the maximum extent of its travel.
Bowden Tube— Allows the filament to traverse from the extruder to the hot end.
Extruder— Unit the utilizes a stepper motor and a gear to move filament backwards and forward. Pay attention to the tension setting to avoid excessive force being applied to the filament, thereby breaking it and wasting hours of time on an unsuccessful print.
Filament Reel–Contains the filament. Ensure when feeding the filament from the spool that you cut the very tip of the filament at an angle to create a sharp point. Increases the likelihood of feeding the filament through the extruder and into the bowden tube.
Dry Box— Mandatory item that passively or actively dries the filament, significantly decreasing the moisture content. Some filaments need special treatment before or after printing while others are hygroscopic.
Firmware– The code that tells the 3D printer what to do and how to do it. This can be customized to allow for higher temperatures, custom screens, etc.
Nozzle— Connected to the hot end to print objects. there are four types of filament listed in ascending order of durability and longevity: brass, steel, ruby, diamond. Brass is perfect for PLA and PETG, steel is a good all around nozzle, ruby is good for carbon fiber laced filaments and all metal hot ends, while diamond is the king for all filaments despite its high expense.
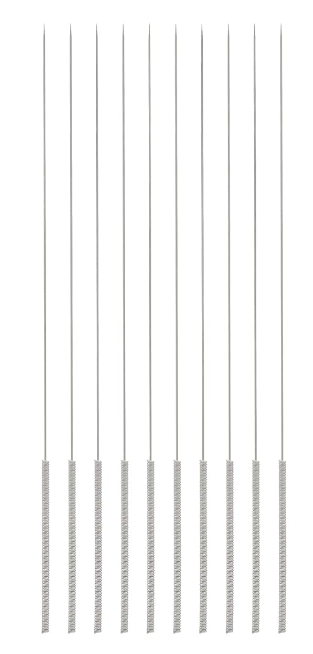
Nozzle Cleaner— Used to clear clogged nozzles.
Once you have everything set up via the previously linked YouTube vid, make sure you calibrate your e-Steps via this video. Its important to calibrate to ensure your printer dispenses the correct amount of filament while printing. After doing the last set of measurements and adjusting your e-step value, I would suggest doing it again so the calibration is as close to perfect as reasonably possible. If you’re off by a tenth of a millimeter I would say you’re good based upon my own calibrations. If you’re a third or a millimeter or more I’d suggest you repeat the steps until you’re at the aforementioned tenth of a millimeter.
Getting Your Slicer
Slicers are free software used to take a CAD (Computer Generated Design) and slice it into thin layers for the 3D printer to print. There are many slicers you can find on Google, but make sure its free as there’s no point spending money on a slicer. If you gain more experience with 3D modelling and you find something that suits your fancy then maybe, but as a beginner there’s really no point as most of your “designing” will be adjusting a few parameters and starting a print.
For the sake of this tutorial I will use the Creality Slicer, though you can use whichever you choose. The common and most popular slicers typically have similar functions.
Downloading is as easy as clicking this link and navigating to the download page and following the steps from there.
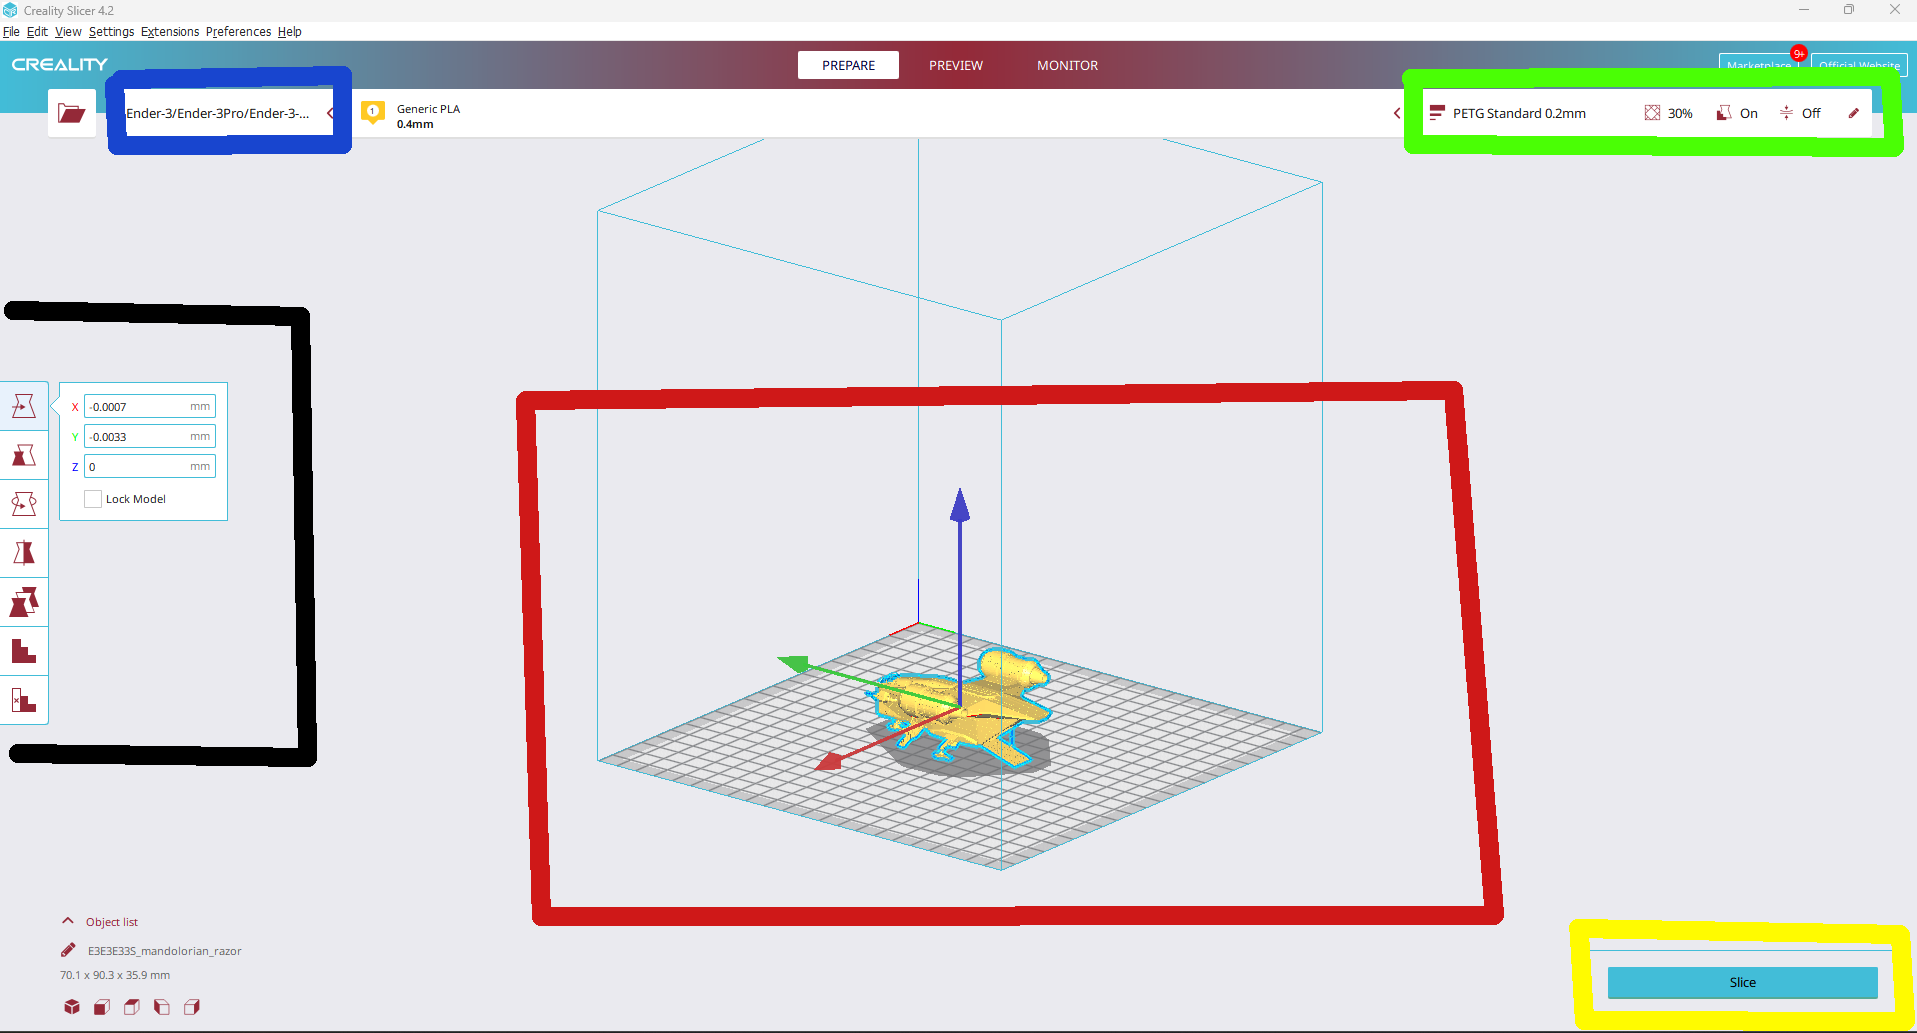
As you can see, I’m an artist hence the beautifully aligned lines. Let’s go ever each color box and explain what to look out for when navigating their contents.
The red box contains the 3D model itself. Its currently selected as I clicked it before taking the screenshot so the contents within the black box would display. The black box settings are used to manipulate the model to move or resize the model.
If you click on empty space where no settings are displayed you’ll see the arrows on the 3D model disappears. You can use your keyboard arrows to move the 3D model around to see its underside, top side, and all around. This is useful if you want to ensure the model looks as you want it and is perched on the virtual build blade and not hovering over it.
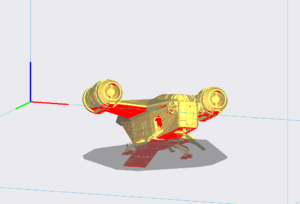
Use your scroll wheel to magnify on the model. Looking at the picture below you can see the red imprints along the model. This color imprint tells you that there’s full contact on the build plate as well as where supports will be generated. Supports are 3D printer generated structures that allow the printer to print where it ordinarily couldn’t due the model reaching out too far. Without the support the filament will droop/ sag or fail to print altogether. To tell if a support will be generated is: 1) Is there a red imprint painted on a portion of the model? 2) Is the red painted portion hovering over the build plate?

Movements Key:
Press Scroll Wheel + Move Mouse = Pan w/ in 2D axis
Roll Scroll Wheel Toward Screen = Zoom in
Roll Scroll Wheel Away From Screen = Zoom out
Press Left/ Right/ Up/ Down Keys = Rotate model left/right/up/ down respectively
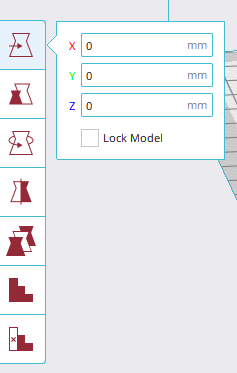
Next is what I call the model manipulation tool, which is in the picture above. Going from the top to the bottom we have:
- The model move tool, which moves the model across or even off the build plate.
- Scale, changes the size of the overall model. Has uniform scaling checkbox option, which evenly changes the model size, and snap scaling, which I recommend against using, but its up to you.
- Rotation, quite self explanatory
- Mirror- Reverses model’s position
- Mesh Type- Adjusts model parameters and consistency
- Custom Support – Self explanatory
- Support Blocker- Self Explanatory
Adjusting Printing Characteristics
Before you print you have to know how to adjust your model’s printing characteristics! Clicking the pencil icon (far right) in the picture opens up the settings.

After clicking settings an entire menu will open. Click each one to change its settings if you wish
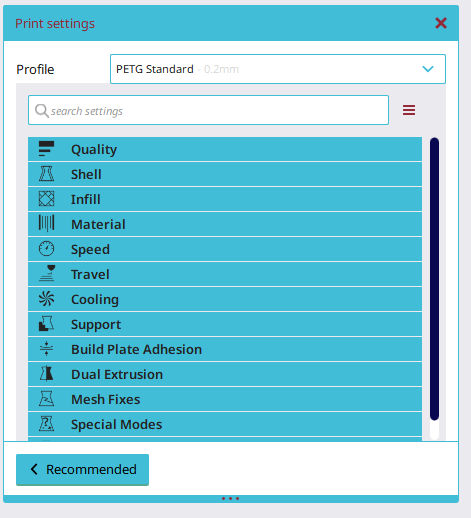
Once you’ve changed the settings (Google to see what needs to be changed for the filament type) you can select the “Slice” option to see the print time, then load it into your SD card, put into your printer, and start printing!